Your landscape was designed to be low maintenance, which with most of our properties we design, is to be trimmed 3 to 4 times a year. Anything more than this we consider a higher maintenance landscape.
There are some plant varieties that may have been requested that require more individual maintenance, such as fern, bouganvilleas, types of vines or ficus, but with any style, the goal and standard for us is to always create a design that requires 3 to 4 trimmings per year.
We suggest to trim seasonally. As we send out the email reminders at a quarterly pace of when is an optimum time to fertilize, we suggest trimming at the same time. More attention to the landscape for trimming & fertilizing the first few years helps the landscape to come in stronger which aids to a greater longevity and health. Some items in the yard may not require to be trimmed this often, in those cases, don’t trim them, but do concentrate on trimming the plant varieties that do need to be cut back.
If things have grown larger and if you haven’t trimmed the landscape in a year or only once or twice in the last year, nothing wrong with giving a bigger trim or a harder pruning back. This will help to thicken the landscape, and is recommended when doing so to cut about 1′ below the level of where you may wish the planting to grow to, when performing a hard trim. For other questions, please feel free to send us your thoughts or questions with photos of the areas you are thinking about through our email link here: universalland75@aol.com
At this time we also would like to state that this article is to help provide you a trimming guide as your landscape grows in for yourself, to help direct your lawn maintenance company, or if you should choose to call us in for a property cleanup. In this aspect, some clients call us once a year to come in and provide this kind of support service if needed and when we perform our work, once a year to clean up, trim and mulch is all that is usually needed for these homeowners. We are always available as a back up, should you feel you need us.
Details on trimming & pruning using the photos below as an example
In the picture below, the larger leaf plantings in the corner aren’t growing as fast as the others on the side of the fence. The plantings in this photo are California Alacacia (larger green leaf, in rear corner) those to the side are Hibiscus bush. (Typically this can be for a couple of reasons, primarily, lack of water or fertilizer to the plantings.)
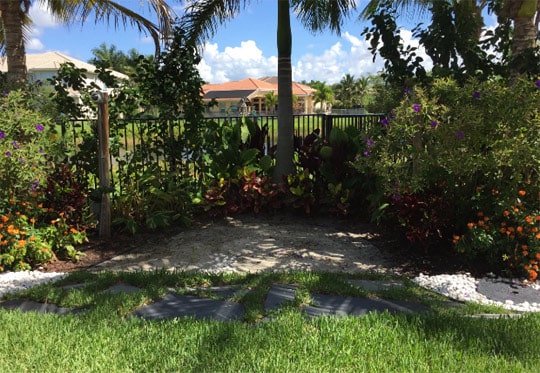
The hibiscus in this photo would be kept well at 4′ to 5′ height. They can be allowed to grow taller but by doing so will become thinner at the bottom the taller they are. In this photo, if desired at 5′ to 6′ tall for the Hibiscus that should work fine if desired, as there are plantings in front of them which help to provide a full lush look and the bottoms of the Hibiscus are out of site.
Regardless, in this photo the Hibiscus are approximately 5′ – 6′ within 2 years of installation and they were planted as a # 3 Gal and height at time of installation was approximately 2′ – 3′. They should be cut back at this time.
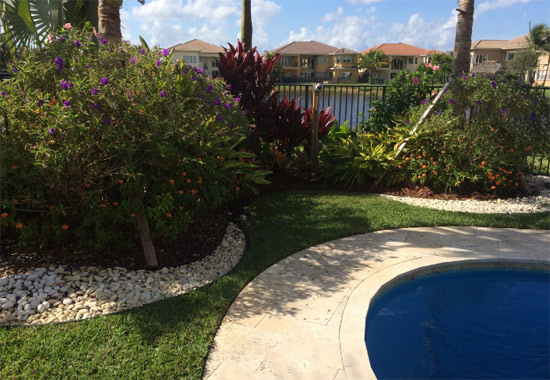
In the photo below: The Tibochina bush are the ones in front at about 4′ with purple flowers and they have the orange flowering Crossandra right below them. Against the fence, the red are the Ti Plant in the very corner, with the large green leaf California Alacacia right in front of them. The Hibiscus Bush are the plantings directly to the right and left of the red leaf Ti Plant on both sides. The Hibiscus are the plantings providing the tallest planting height of the landscape bed, all others should be shorter than them. (Trimming 3 to 4 times a year, or once per season at least, will help this garden to mature as it should.
When trimming a younger landscape within its first few years after being newly installed
Please keep in mind the height you wish it to mature or that it was intended to be at.
For this purpose by the fence, being the planting against the fence, the Hibiscus bush can be maintained at a height preferably between 4′ to 6′. You decide which height you might like it best at.
For example, if you wish the Hibiscus bush to be at 4′ in the grander scheme of your new landscape installation, then these bushes in this photo should be cut to at least 3 1/2′ at this time. This harder pruning back, at least 2 to 3′ feet off the height of the planting as it appears in this photo is ok and actually healthy for the plantings in their younger years. So, to tighten up the planting at 4′, cut at least a half a foot lower than the desired height.
If you wish the Hibiscus to be mature and thick at 6′ trim them back to approximately 4′ height, or the height of the fence rail at this time. As the Hibiscus have been in the ground for a couple of years, and not trimmed regularly – they are growing taller and more sparse than desired. After the hard pruning, they will thicken and then gradually over the course of the year you can raise the trim level each time. A year from now, trimming 3 to 4 times a year, they should be much thicker and dense at the same 6′ level and also healthier.
The Tibochina bush (with the purple bloom in front) should be kept to coordinate with the level of the hibiscus. The Tibochina bush can be maintained at 3 to 3 1/2′ feet tall, but in no case should be allowed to grow un-trimmed above 4′. It will both crowd out the bed too much and thin out the Tibochina. A 3′ to 3 1/2′ height on the Tibochina would be optimum and again – trimming 3 to 4 times a year at most should accomplish this.
One trim per season for the first few years & if coordinate with 2 to 3 fertilizations per year – the landscape will be on track with care to not only be healthier, but fuller and on track to a greater longevity.
I want to grow a thick hedge for privacy, as quickly as possible, but I also want it to be dense so you can’t see through the hedges.
In this situation we often see people fore go trimming as required, or only trimming off shoots of a plant or hedge that are growing astray to the side , and they are not willing to trim the top.
The logic is “I don’t want to trim the top because that’s where I want it to grow quickly.” If you follow this thought and keep with this plan, yes it will get up to the height you wish quicker, but once there it will take longer to fill in. The size of the planting at the time of installation is always relative. Now if you want a 6′ hedge and you planted # 15 Gal plantings that were 5′ to 6′ at the time of installation, no worries, just continue to trim at that desired height of 6′ to 7′ feet and they will be fine.
However, if you planted a privacy hedge at # 3 Gal size which was roughly anywhere between 1′ 1/2 to 3′ at the time of installation, depending on the variety of privacy hedging and available size at the time, your trimming strategy will be a bit different.
You will want the hedging to grow quickly of course, fertilizing again 3 to 4 times per year will help to give it a continual nutrient boost to get there in a healthy & quicker way than not fertilizing, you can add milorganite into the soil between the hedges in the spring and again in the summer (visit our article “An Introduction to Your Landscape”
Get more info here on fertilizing at: http://www.universaldevgroup.com/customer-corner.php#introduction
Trimming your new hedge from that # 3 Gal or # 7 Gal size, again, keep the top in check a bit. Let it grow of course, but pick a line across the entire hedge where the height appears to average out and then once to twice a year trim just a few inches below that average height line, all the way across the hedge.
This will have the entire hedge growing closer to the same pace as it matures. This will also help the hedge to be fuller as it reaches the desired height for privacy that you may have in mind.
With younger hedges, as in the photo below showing # 3 gal Podocarpus hedge that was installed 12 to 18 months prior to this photo, a light top & side trim is all that should be needed. Not cutting too much off the top, just topping off and a bigger trim on some shoots that might be a lot taller than average, but also focusing on those shoots that are growing more towards the side and drooping. This will have the entire hedge growing closer to the same pace as it matures. This will also help the hedge to be fuller as it reaches the desired height for privacy that you may have in mind.
The embedded video here shows an example of trimming a Podocarpus hedge that was installed at # 3 Gal about a year and a half prior to this video of simply performing a light pruning trim from the tops and sides.
At this stage of the growth of this Podocarpus hedge in the video, the new hedge was still growing at different rates, the objective at this point was to thicken the hedge, just topping it off from shoots that were growing taller than the rest as well as those new growth shoots that were going to the side and drooping.
The photo below shows how this hedge has grown in approximately 9 months after the video, keeping with this pruning style and guidance as described in the article above and also shown in the video.
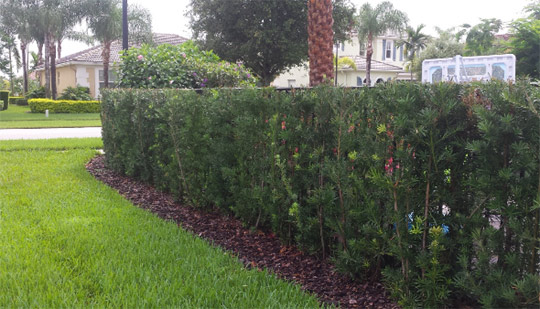
As the photo shows, the hedge is growing into the desired height, which in this example is at 6′ tall, which is also the height of the fence. As it reaches maturity, as the photo shows, there are not flimsy branches which are leaning over, or large pockets, but a full planting. This is only accomplished, in the quickest method, by trimming as we state, at a low maintenance pace of 3 to 4 trims per year and by cutting some height off with each trim.
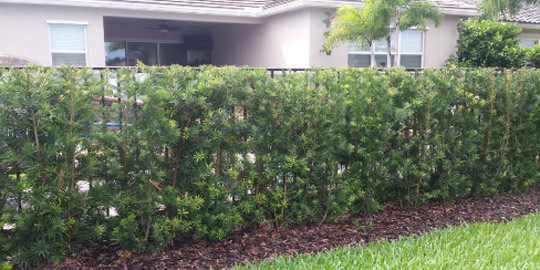
Please Note : The Podocarpus hedge in the 2 photos above has just reached its desired height and it is clear how the hedge is largely showing consistent growth in height and thickness. This is due, as the video and the details of trim noted above, have been followed by this customer as we recommend.
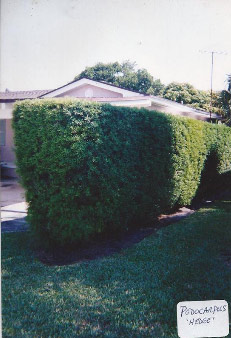
Podocarpus hedge The photo on the left is an example of how a mature, well maintained & cared for Podocarpus hedge, that should serve as an example of how every Podocarpus hedge should look, even a # 3 Gal hedge installed, within a few years after installation.
The plant selection is very important to accomplish the goal and if you are a customer of ours we are sure you should remember that planning with us. If not, contact us for any questions you might have, always best through our email to help keep track & guarantee a more speedy reply. Phone calls and texts often are disregarded as phone numbers aren’t recognized and is less helpful to track the time of requests and the query history. We also use your emails as a training tool for questions and customer service improvement.
One thing never to do, no matter what variety of planting or hedge you might have as illustrated here in this photo below:
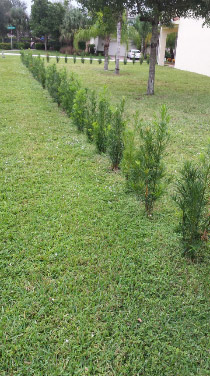
In this photo the main thing to notice is that there is no landscape bed, just Podocarpus planted in the ground with the lawn kept right up to the base of them.
Podocarpus hedge The Reasons why having no landscape bed for any planting is bad :
1) The lawn takes away nutrients from the plant, so it will grow at a slower rate.
2) When maintaining the lawn and trimmed with a weedeater, the plants regular will normally be struck by the cord of the weedeater. Each time a plant or tree is struck by a weed eater the plants nutrients go to heal the wound, and those same nutrients that were to go for new growth are diverted and lost in the ongoing need to heal the plant (or trees) wounds.
3) Not having a bed cut out and mulched, provides more competition for nutrients, even when fertilizing the lawn is fed first by the root ball of the plants, there is less ‘breathable space’ for the plants roots for direct benefits also of rainfall or irrigation.
In a nutshell, if you don’t want your hedge to struggle or die, or to grow very slowly, don’t let the lawn grow to the base of the plantings. Always have a clean & mulched bed for best growth. Mulch should typically be at about 1″ in depth. Too deep can also choke out a plant with too much moisture and cause root rot if the mulch is very deep.
Watering is also very important and most people over water and actually hurt the landscape by doing so.
After the introductory period of the first few months – this is talking about after 6 months through the first few years and beyond — It is better to water heavier and less often than a little bit daily. It is healthier for your new landscape installation to help your landscape rely on nature more than your assistance by irrigation.
Once to twice a week watering for 45 minutes to an hour per zone is all that your landscape should need a week. Many properties that have been xeroscaped can even make due with less and possess a strong healthy root system which is the key to a healthy and drought tolerant yard.
If it rains during that time, a good rain, you shouldn’t even need to irrigate the lawn or landscape. Now annual flowers are different than a perennial landscape, ( a perennial landscape is one that is designed with plantings that are intended to last 5, 10 to 15 years or better). With annuals they will require watering more often as they have shallow roots, a short life cycle and require more watering to produce their blooms.
For a main landscape, think of letting the landscape live off of nature and natural rainfall and your job is to use the irrigation to only assist. If you have more questions of fertilizing, watering or trimming, feel free to tour the “Customer’s Corner” page of our website for more informative articles such as this.
We hope your yard is looking great and we work to support you with information to help you maintain that goal and are also available through our email primarily to track & respond to your questions.
If you are a customer of ours, we hope you find this article helpful, if you are not a customer of ours – we hope you’ll keep us in mind for your next project or makeover.
All our best,
Sincerely,
Universal Landscape, Inc.
(561) 722 – 0252
office@universallandscapefl.com

